Hi, All
Juniper LAB in GNS3 Installation video with networking......
Click Here To download ConfigurationVideo
Download all the required software from the Links mentioned below and
keep all in a folder.
(Thanks for all forum related to gns3 juniper discussion)
1. Junos file part1--http://www.4shared.com/file/aw3BfhNQ/jinstall-101R18-domestic-olive.html
Junos file part2--http://www.4shared.com/file/GG0Fdbik/jinstall-101R18-domestic-olive.html
Junos file part3--http://www.4shared.com/file/uuzrjuu7/jinstall-101R18-domestic-olive.html
2. BSD OS-- ftp://ftp-archive.freebsd.org/pub/FreeBSD-Archive/old-releases/i386/ISO-IMAGES/4.11/4.11-RELEASE-i386-miniinst.iso
3. HJsplit-- http://www.4shared.com/file/W27ckARB/hjsplit.html
4. ISO creator--http://www.4shared.com/file/5sIyV3W0/freeisocreator.html
5.Installation steps--http://www.4shared.com/document/o4D2jryl/Juniper_gns3_steps.html
6. Juniper Router Installation Logs --http://www.4shared.com/document/y0p-TnAu/juniperinstallation.html
7.Qemu --http://www.4shared.com/file/N87Z9Fv4/qemu-0110patchedwin32.html
---------------------------------------------------------------------------------------------
Steps for installing BSD OS in qemu:
-----------------------------------------
* Extract qemu-0.11.0.patched.win32.zip and Keep as folder named Qemu.
* Place 4.11-RELEASE-i386-miniinst.iso inside qemu folder.
* To create Junos Binary image apply the below command
qemu-img.exe create junos-binary.img -f qcow2 8G
* Now junos-binary.img is created with max space of 8Gb.
* To insert BSD OS cd use the below command
qemu -m 256 -hda junos-binary.img -cdrom 4.11-RELEASE-i386-miniinst.iso
Press ctrl+alt to come out of qemu window.
* choose express installation
* Press A
* Press Q
* Enter Standard installation.
Now partion creation:
------------------------
* press c
Type 2048M select FS mount point /
* Again press c
Type 1024M select swap
* Again press c
Type 100M select FS mount point /config
* Again press c
Selct remaing space selct FS mount point /var
selct Q
* Selct option 8----> Users
for port collection say NO.
then select exit
* select Installation media as CD/DVD
* User confirmation requested press- yes
Installation started..........
* User confirmation requested press- yes
* set the root password
Then Exit...
Now BSD is installed in virtual machine.
---------------------------------------------------------------------------------------------
Steps to install Junos OS in BSD OS:
------------------------------------------
* Use Hjsplit.exe to join all the splitted junos os file.
* Use freeisocreator.exe to make junos os into iso image so that we can mount like cd and install it
,instead of going for ftp to load that file into junos-binary.img
* Place junos.iso inside quemu folder.
* Use below command to boot junos-binary.img with junos.iso as mounted as CD.
qemu -m 256 -hda junos-binary.img -cdrom junos.iso
Steps to untar the signed junos image in iso :
------------------------------------------------
#mount /cdrom
#cd /var/tmp
#mkdir junos
#cd junos
#tar zxvf /cdrom/jinstall-10.1R1.8-domestic-olive.tgz
Then untar the unsigned image:
----------------------------------
#mkdir jinst
#cd jinst
#tar zxvf ../jbundle-10.1R1.8-domestic.tgz
#cd..
Extract the pkgtools.tgz file and replace the checkpic binary inside with /usr/bin/true :
-----------------------------------------------------------------------------------------
#mkdir pkgtools
#cd pkgtools
#tar zxvf ../pkgtools.tgz
#cd bin
#cp /usr/bin/true ./checkpic
#cd ..
Create tar for pkgtools then remove the directory:
---------------------------------------------------
#tar zcvf ../pkgtools.tgz *
#cd ..
#rm -rf pkgtools(remove that folder)
Create tar for the new jinstall package with modified checkpic
---------------------------------------------------------------------
#tar zcvf /var/tmp/juniper.tgz *
(Will take more time to zip depend on system config)
Then install the new jinstall with bsd pkg_add tool:
--------------------------------------------------------------------
#pkg_add -f /var/tmp/juniper.tgz
Will take some time to process.......
It will ask to reboot to continue the installation.
#init 6
then after it started reboot just close the qemu.
-------------------------------------------------------------------------------------------------------------
Now put the below command and see the installation of junos
------------------------------------------------------------
qemu -L . -m 512 -hda junos-binary.img -serial telnet:127.0.0.1:1001,server,nowait,nodelay –localtime
* now telnet 127.0.0.1 1001 to see the installation
One installation is finished and prompt is returned press Crtl+Alt+2 then type “q” press enter
Now junos-binary.img is ready for gns3.
-------------------------------------------------------------------------------------------------------------
Steps for adding 2 juniper router in gns3 with external world communication::(GNS3 version 0.7.2)
-------------------------------------------------------------------------------------------------------------
* copy the junos-binary.img separately and rename as juniper1.img
* Again copy junos-binary.img in same folder and rename as juniper2.img
* Open GNS3 and go to Edit-->Preference-->quemu-->junos-->add the juniper1.img then press ok.
* Now drag and drop 2 juniper router in workspace and edit 2nd router
config and change binary from juniper1.img into juniper2.img
* Also drag and drop cloud for local ethernet card integration.
Juniper1-192.168.200.2
Juniper2-192.168.200.1(192.168.1.3-which is in my host NIC card LAN)
Reachablility between all are present Now..
--------------------------------------->I made simple connectivity
config and now run as many as u can and test MPLS and BGP and enjoy.
Once again thanks to gns3 team and all forum related to gns3 juniper discussion.
All the best.
Showing posts with label Layanan. Show all posts
Showing posts with label Layanan. Show all posts
Monday, December 24, 2012
Thursday, December 13, 2012
Iran Luncurkan Tiruan Youtube
TEHERAN--Situs berbagi video gratis di dunia bertambah.
Pasalnya Iran kini telah meluncurkan situs web baru untuk warga
negaranya guna berbagi video pendek layaknya YouTube.
Website yang dinamakan Mehr yang berarti kasih sayang menurut bahasa Persia, dijalankan oleh Republik Islam Iran Broadcasting. Selain Mehr, Iran juga memiliki saluran video lokal populer "Aparat", yang dikelola oleh perusahaan yang sama, juga jaringan sosial Iran Cloob.
Menurut BBC, jaringan YouTube yang dioperasikan Google, diblokir di negari mullah sejak 2009 meski masih banyak warga Iran mengaksesnya. Mereka menggunakan jaringan privat Virtual, atau VPN, yang dilarang penggunaannya tetapi memungkinkan peselancar untuk mem-bypass filternya.
Video online sangat populer di Iran tetapi dengan kecepatan internet yang rendah, kurang daripada 1Mbps (megabit perdetik) membuat streaming jadi masalah besar. "Memiliki kecepatan, streaming berkualitas baik dan video yang stabil mustahil. Men-downloadnya adalah pilihan yang lebih andal," kata wartawan BBC Adel Shaygan, dikutip dari bbc.co.uk, Selasa (12/11).
Sementara ini belum ada data tentang penggunaan Mehr, namun konten "Aparat" yang telah beredar selama beberapa tahun, merupakan 13 situs paling populer di Iran menurut Alexa. Layanan video streaming Aparat berbasis di Iran dan mematuhi undang-undang lokal yang mengatur isinya tetapi memiliki sponsor Internasional termasuk perusahaan elektronik LG.
YouTube resmi disensor di negara itu setelah terjadinya aksi protes dan tuduhan manipulasi hitungan suara pada pemilihan Presiden Mahmoud Ahmadinejad tahun 2009.
Blokir Youtube, Iran Bikin Video Streaming Lokal
TEHERAN--Situs berbagi video gratis di dunia maya
bertambah. Pasalnya Iran kini telah meluncurkan situs web baru untuk
warga negaranya guna berbagi video pendek layaknya YouTube.
Website yang dinamakan Mehr yang berarti kasih sayang menurut bahasa Persia, dijalankan oleh Republik Islam Iran Broadcasting. Selain Mehr, Iran juga memiliki saluran video lokal populer "Aparat", yang dikelola oleh perusahaan yang sama, juga jaringan sosial Iran Cloob.
Menurut BBC, jaringan YouTube yang dioperasikan Google, diblokir di negari mullah sejak 2009 meski masih banyak warga Iran mengaksesnya. Mereka menggunakan jaringan privat Virtual, atau VPN, yang dilarang penggunaannya tetapi memungkinkan peselancar untuk mem-bypass filternya.
Video online memamg sangat populer di Iran. Tetapi dengan kecepatan internet yang rendah, kurang daripada 1Mbps (megabit perdetik) membuat streaming jadi masalah besar. "Memiliki kecepatan dan streaming berkualitas baik dan video yang stabil itu mustahil. Men-downloadnya (Mehr) adalah pilihan yang lebih baik," kata wartawan BBC Adel Shaygan.
Sementara ini belum ada data tentang penggunaan Mehr, namun konten "Aparat" yang telah beredar selama beberapa tahun, merupakan 13 situs paling populer di Iran menurut Alexa. Layanan video streaming Aparat berbasis di Iran dan mematuhi undang-undang lokal yang mengatur isinya tetapi memiliki sponsor Internasional termasuk perusahaan elektronik LG.
YouTube resmi disensor di negara itu setelah terjadinya aksi protes dan tuduhan manipulasi hitungan suara pada pemilihan Presiden Mahmoud Ahmadinejad tahun 2009.
Wednesday, December 12, 2012


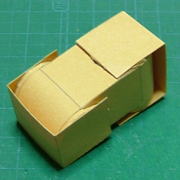
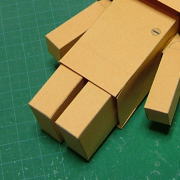
Cara Membuat Boneka Danbo
"DANBO
adalah kependekan dari Danboard, dibuat dari kertas karton board.
Boneka ini adalah kreasi dari Azuma Kiyohiko seorang komikus serial
manga Yotsuba. Bentuk boneka ini sangat unik, yaitu action figure dengan
penampilan seperti manusia dengan ukuran mini 7 cm dan 13 cm. Siapa
pun pasti akan merasa gemas ketika melihat si Danbo ini. Bagaimana tidak DANBO dapat digerakkan secara manual dan dibentuk dengan berbagai macam gaya unik.
Perusahaan
yang membuatnya menggunakan teknologi tinggi di setiap persendian
boneka ini sehingga membuatnya mampu bergerak luwes. Ekspresi dari si
kardus imut ini menjadi daya tarik utama. Danbo sendiri di jepang dijual dengan harga mulai dari 5000 yen atau sekitar Rp. 500.000 rupiah per bijinya. Dalam serial manganya danbo
mungil ini dapat bergerak ketika ada koin yang dimasukan kedalam
mulutnya. Anda tertarik memilikinya? Saat ini boneka kardus ini bisa
dipesan Online di Amazon.jp."
Jadi bagi anda yang tidak punya duit untuk memesan silahkan anda
buat sendiri saja yah ,Selain biayanya murah kita juga bisa
mengasah kreativitas kita disini .
Cara membuat boneka danboa /danboard tidaklah sesulit
membuat anak ... lol :) . Tapi Membuat boneka danbo tidak
semudah membalikkan telapak tangan , Jadi Membuat boneka
danbo anda hanya perlu rileks kalau perlu sediakan snack sebagai
pelengkap anda dan penenang anda , jagan streess ya


>>Alat dan Bahan nya yaitu Gunting , Lem kertas, dan pisau cuute( kalau g ada gunting )<<
>> Silahkan anda print ke dua Gambar Diatas<<
>>Kemudian Gunting sesuai dengan pola<<
>>Setelah itu Lihat gambar yang ada <<
di bawah ini kemudian ikuti dan
bentuk pola sesuai dengan gambar
yang ada di bawah ini.
No 1 Dibentuk Menjadi kepala Danbo

No 16 Dibentuk Menjadi Tangan Danbo
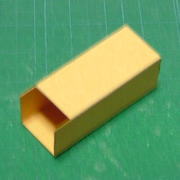
No 8 Dibentuk Menjadi Badan Danbo
No 3 Dibentuk sesuai pola , Kemudian di rekatkan

pada tangan danbo / pada no 16
No 6 Dibentuk sesuai dengan pola
dan membuat bagian seperti tabung, sebagai engsel penggerak pada tangan Danbo dan No. 07 untuk penutupnya. Setelah itu, untuk tempat engselnya di gunakan pola No. 09

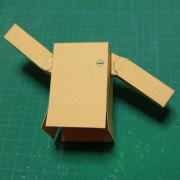
Gabungkan Tangan denga tempat Engsel yang telah anda buat .
Setelah itu Gabungkan Tangan dengan badan danbo ( no 8 )
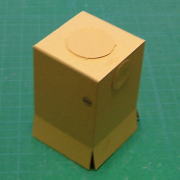
Bentuklah
tabung dari No. 15, sebagai penutup tabung gunakan lingkaran pada No.
14. Kemundian gabungkan tabung-tabung tersebut dengan pola No. 13. Ini
adalah sebagai engsel pada kepala.

Gabungkan pola No 12 dengan engsel kepala.
Rekatkan engsel kepala tersebut pada bagian badan Danbo.
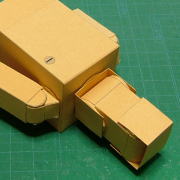
Rekatkan bagian kepala ke engsel kepala tersebut.

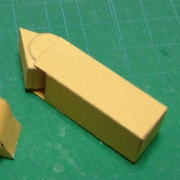
No 2 Dibentuk menjadi kaki kaki danbo
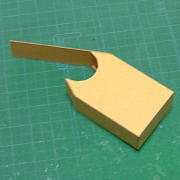
Buatlah
engsel pada kaki dengan membentuk tabung pada pola No. 17, dengan
lingkaran penutup No. 5. Gabungkan kedua kaki dengan engsel tersebut.
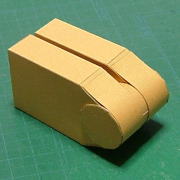
Rekatkan kaki yang sudah jadi di bagian dalam badan Danbo tersebut.

Jadi Bagaimana menurut anda ? cara membuat boneka danbo .Bagus , lucu , atau Kurang menarik ?
yah , semua itu tergantung dari model yang anda buat sendiri karna
tidak semua manusia mempunyai tingkat kreativitas yang tinggi tapi
kreativitas itu dapat kita asah apabila ada kemauan keras untuk me
ngasahnya dan asal anda tahu , kreative itu sangat berbeda dengan
sesuatu yang lainya .
Demikianlah Cara membuat boneka danbo,danboard versi saya .
# SELAMAT BERKREATIVITAS #
Tuesday, December 11, 2012
Berita Acara
BERITA ACARA / SATISFACTION NOTE
Nama kapal : SPOB. BENUA RAYA VIII
Tempat / lokasi : Ramba, Sei. Lilin
Mulai pekerjaan : 23 September 2012 – 08.30 LT
Selesai pekerjaan : 23 September 2012 – 13.00 LT
Jenis pekerjaan : - Perbaikan Oil Cooler AE Port
Side
1.
Perbaikan water cooler AE Portside
Pemeriksaan dan perbaikan Water Cooler AE
Portside dilaksanakan oleh crew kapal beserta Port Engineer PT. Oceanindo Prima
Sarana.
Result of Inspect Kondisi pendingin oli bocor
Result of Work Kebocoran pada pendingin olinya dimana
terjadi percampuran oli dan air tawar
yang masuk ketabung air tawar dan silinder mesin bantu.
Recom. Action Mengganti spare part dengan specification :
Merk :
WEICHAI Diesel Engine
Type :
CCFJ24J-WJ
No.
Seri :
071231492
RPM :
1.500 RPM
Power
out :
24 KW
Picture reference
|
 |

|
PELAJU, 23 September 2012
|
|
|
Knowledge by :
MASTER
|
Prepare by :
Chief Engineer
|
|
Acknowledge by
|
|
|
Port Engineer
SUPIYAN
|
Techinal Director
M. BUDIARMAN, M.Mar.E
|
Monday, December 10, 2012

Thursday, June 16, 2011
Bila tertarik untuk membangun sebuah jaringan RT/RW Net. Di wilayah Bandung saya siap untuk di calling untuk membangun jaringan tersebut anda dapat melihat peralatan yang di butuhkan dan modal seluruhnya di ebook ini DOWNLOADdoc
Biodata Costumer Pemasangan Jaringan RT/RW Net:
Nama : Herva Savaruly
Alamat : Kp.Blok Salim RT/RW 01/03 Kec.Padalarang Desa. Kertajaya
Kode Pos : 40553
Kota : Kab.Bandung Barat
No.Tlp : 085624033604
di tunggu..........client
Biodata Costumer Pemasangan Jaringan RT/RW Net:
Nama : Herva Savaruly
Alamat : Kp.Blok Salim RT/RW 01/03 Kec.Padalarang Desa. Kertajaya
Kode Pos : 40553
Kota : Kab.Bandung Barat
No.Tlp : 085624033604
di tunggu..........client
Tuesday, March 15, 2011
SETTING GPRS OTA (OVER THE AIR)
Ditulis oleh herva savarully dibandung/pada Oktober 28, 2008
SETTING GPRS OTA (OVER THE AIR)
Mentari :
Ketik SMS: GPRS‹spasi›MerkHP‹spasi›TypeHP
Kirim Ke: 3000
Contoh: GPRS NOKIA 7650
Matrix :
Ketik SMS: GPRS‹spasi›MerkHP‹spasi›TypeHP
Kirim Ke: 3939
Contoh: GPRS NOKIA 7650
IM3 :
Ketik SMS: GPRS‹spasi›MerkHP‹spasi›TypeHP
Kirim Ke: 3939
Contoh: GPRS NOKIA 7650
XL :
Ketik SMS: GPRS‹spasi›MerkHP‹spasi›TypeHP
Kirim Ke: 9667
Contoh: GPRS NOKIA 7650
Telkomsel :
Ketik SMS: GPRS‹spasi›MerkHP‹spasi›TypeHP
Kirim Ke: 5432
Contoh: S NOKIA 7650
Halo
Daftar di GRAPARI atau Ketik SMS: “GPRS” kirim ke 6616 untuk aktifkan MMS : ketik SMS : “MMS” kirim ke 6616
Setelah anda kirim smsnya, anda akan menerima sms settingan secara otomatis dari operator celluler anda, silahkan langsung di simpan, maka secra otomatis celluler anda akan tersetting, sesuai kebiasanya, and akan disuruh memasukkan password/pin yg dikirim lwt sms
Adapun utk pengaturan email karena banyak metoda yg tiap handphone berlainan dan akan membuat anda bingung (kecuali yg sdh terbiasa), lebih baik anda memakai cara ini;
Gmail: ketik di halaman browser anda (GPRS sdh aktif) http://m.gmail.com/
Yahoo: ketik di halaman browser anda (GPRS sdh aktif) http://id.m.yahoo.com/p/mail
atau http://m.yahoo.com nanti akan keluar pilihan utk mail, yahoo messenger, dll
Setting Manual
TELKOMSEL
I. GPRS
A. Data Communication
Go to menu Setting, and press Select
Choose Connectivity., and press Select
Choose Data communication., and press Select
Choose Data account, and press Select
Choose New account, and press Select
Choose GPRS data, and press Select
New account, enter data :
Name : TEL-GPRS
APN : telkomsel
User Name : wap
Password : wap123
Choose Save and then choose TEL-GPRS select Edit
Allow calls : Automatic
IP Address :
DNS Address :
Authentication : None, PAP, CHAP ( Check List )
Data Comp. : Off
Header Comp. : Off
B. Internet Settings
Go to menu Internet settings, and press Select
Choose Internet profile, and press Select
Choose New profile, and press Select
Name : TEL-GPRS
Connect using : TEL GPRS, and press save
Choose TEL GPRS, and press More
Choose Settings, and press Select
Connect using : TEL-GPRS
Use proxy : Yes
Proxy Address : 010.001.089.130
Port number : 8000
User name : wap
Password : wap123
Press Save
Then Back to Internet Setting > Internet profiles
Choose TEL GPRS, and press More
Choose Advanced, and press Select
Choose Change homepage, and press Select
Name : Sony Ericsson
Address : http://wap.sonyericsson.com
Press Save
II. MMS
A. Data Communication
Go to menu Setting, and press Select
Choose Connectivity, and press Select
Choose Data communication., and press Select
Choose Data account, and press Select
Choose New account, and press Select
Choose GPRS data, and press Select
New account, enter data :
Name : TEL MMS
APN : mms
User Name :
Password :
Choose Save and then press TEL MMS, press edit
Allow calls : Automatic
IP Address :
DNS Address :
Authentication : None, PAP, CHAP ( check list )
Data Comp. : Off
Header Comp. : Off
B. Internet Settings
Go to menu Internet settings, and press Select
Choose Internet profile, and press Select
Choose New profile, and press Select
Name : TEL MMS
Connect using : TEL MMS, and press save
ChooseTEL MMS, and press More
Choose Settings, and press Select
Connect using : TEL MMS
User Proxy : Yes
Security : Off
IP Address : 010.001.089.150
Port Number : 8080
User name : wap
Password : wap123
Press Save
Then Back to Internet Setting > Internet profiles
Choose TEL MMS, and press More
Choose Advanced, and press Select
Choose Change homepage, and press Select
Name : Sony Ericsson
Address : http://wap.sonyericsson.com
Press Save
C. Message Server
Go to menu Messaging
Select Settings
Select Picture Message
Validity Period : Network maximum
Read Report : Off
Delivery Report : ON
Signature : No Signature
Creation Mode : Alert
Picture Scaling : Off
Auto Download : Always
Accept Messages : Advertisements [check list]
Anonymous [check list]
MMS Profile : TEL MMS
Then Back to Picture Message > MMS profile
Choose TEL MMS, and press Edit
Press More TEL MMS, and Select Edit
MMS Profile Name : TEL MMS
Message Server : http://mms.telkomsel.com
Internet Profile : TEL MMS
Select OK
Press Save
Download setting manual (*.doc)
Cara aktivasi GPRS :
Langkah 1 mengaktifkan layanan GPRS di kartu :
Ketik SMS : GPRSonno_chip_kartu
Contoh : GPRS on 62218686690
Kirim ke : 6616
langkah 2 mengaktifkan GPRS ponsel anda :
Setting GPRS Automatis :
Ketik SMS : S‹spasi›MerkHP‹spasi›TypeHP
Contoh : S NOKIA 7650
Kirim Ke : 5432
Atau :
Setting GPRS Manual :
Profile Name : TSEL GPRS
APN : Telkomsel
User name : wap
Password : wap123
Authentication : Normal
Gateway IP address : 10.1.89.130
Homepage : http://wap.telkomsel.com
Data Bearer : GPRS
Proxy port number : 9201 atau 8000
INDOSAT MATRIX & MENTARI
Contoh Setting GPRS di Sony Ericsson T610
Setting Data Account GPRS
1. Tekan tombol navigasi untuk masuk ke menu utama
2. Pilih icon “Connectivity”
3. Pilih menu “Data comm.”
4. Pilih menu “Data accounts”
5. Pilih menu “New account”
6. Pada menu Account type pilih menu “GPRS data”
7. Pada Name: isi “Satgprs”
8. Pada menu New GPRS data isi parameter berikut :
• APN : satelindogprs.com
• User id : (kosongkan)
• Password : (kosongkan)
9. Tekan tombol save
Setting WAP
1. Tekan tombol navigasi untuk masuk ke menu utama
2. Pilih icon “Connectivity”
3. Pilih menu “WAP options”
4. Pilih menu “WAP profiles”
5. Pilih menu “New profile”
6. Pada menu New profile isi parameter berikut :
• Name : Satgprs
• Connect using : pilih Satgprs
• IP address : 202.152.162.250
7. Tekan tombol save
8. Masih dimenu “WAP Profiles”
9. Pilih “Satgprs”, tekan “Select”, lalu tekan “Edit” v 10. Pilih menu “Advanced”
11. Pilih menu “Change homepage”
12. Pada menu Change homepage isi parameter berikut :
• Name : Satgprs
• WWW Address : hapus [Internal address] ganti dengan “http://satwap”
13. Tekan tombol panah sampai kembali ke standby.
14. Tekan tombol navigasi untuk masuk ke menu utama
15. Pilih icon “Internet services”
16. Pilih tombol “More”
17. Pilih “Satgprs” untuk mulai WAP browsing.
Cara penggunaan GPRS
1. Internet option
2. More
3. Pilih Menu Bookmarks
4. Pilih menu Add Bookmarks
• Title: Yahoo atau MIS
• Address: http://www.gsi-biz.com/mobile_gsi.jar
Setting GPRS Mentari, Matrix, IM3, XL, Telkomsel
MENTARI :
Setting GPRS OTA :
Ketik SMS: GPRS‹spasi›MerkHP‹spasi›TypeHP
Kirim Ke: 3000
Contoh: GPRS NOKIA 7650
Setting GPRS Manual :
Profile Name INDOSATGPRS
User name : indosat
APN : www.satelindogprs.com
Password : indosat
Gateway IP : 10.19.19.19
Homepage : http://wap.klub-mentari.com
Data Bearer : GPRS
Proxy port number :
MATRIX :
Setting GPRS OTA :
Ketik SMS: GPRS‹spasi›MerkHP‹spasi›TypeHP
Kirim Ke: 3939
Contoh: GPRS NOKIA 7650
Setting GPRS Manual :
Profile Name satelindo Homepage
User name :
APN : www.satelindogprs.com
Password :
Gateway IP : 202.152.162.250
Homepage : http://wap.matrix-centro.com
Data Bearer : GPRS
Proxy port number : 9201
IM3 :
Setting GPRS OTA :
Ketik SMS: GPRS‹spasi›MerkHP‹spasi›TypeHP
Kirim Ke: 3939
Contoh: GPRS NOKIA 7650
Setting GPRS Manual :
Profile Name
User name : gprs
APN : www.indosat-m3.net
Password : im3
Gateway IP : 010.019.019.019
Homepage : http://wap.m3-access.com
Data Bearer : GPRS
Proxy port number : 9201 atau 8080
XL :
Setting GPRS OTA :
Ketik SMS: GPRS‹spasi›MerkHP‹spasi›TypeHP
Kirim Ke: 9667
Contoh: GPRS NOKIA 7650
Setting GPRS Manual :
Profile Name : XL GPRS
User name : xlgprs
APN : www.xlgprs.net
Password : proxl
IP Address : 202.152.240.50
Homepage : http://wap.lifeinhand.com
Data Bearer : GPRS
Proxy port number : 8080
TELKOMSEL :
Setting GPRS OTA :
Ketik SMS: S‹spasi›MerkHP‹spasi›TypeHP
Kirim Ke: 5432
Contoh: S NOKIA 7650
Setting GPRS Manual :
Profile Name : TSEL GPRS
APN : Telkomsel
User name : wap
Prompt Password : No
Password : wap123
Authentication : Normal
Gateway IP address : 10.1.89.130
Homepage : http://wap.telkomsel.com
Connection Security : Off
Session Mode : Permanent
1. Kecuali untuk kartu IM3, penyetingan GPRS atau MMS memerlukan proses aktivasi terlebih dahulu.
2. Proses aktivasi dilakukan dengan cara menghubungi operator yang bersangkutan sesuai kartu yang digunakan.
3. Mengenai cara melakukan aktivasi secara detil dapat dilihat pada detil penyetingan GPRS di bawah ini.
Setting GPRS Matrix / Mentari
Profile Name : satelindo
Homepage URL : http://wap.matrix-centro.com
IP Address : 202.152.162.250:9200
Bearer : GPRS
User Name :
Password :
APN : satelindogprs.com
Three
GPRS Settings
Settings’ Name: 3-GPRS
Homepage : http://wap.three.co.id/
Proxies : Enable
Proxy address : 10.4.0.10
Port : 3128
GPRS access point : 3gprs
Authentication type : Normal
Login type : Automatic
Username : 3gprs
Password : 3gprs
MMS Settings
Settings’ name : 3-MMS
Homepage : http://mms.hutch.co.id/
GPRS access point : 3mms
Authentication type : Normal
Username : 3mms
Password : 3mms
Allow adverts : No
Subscribe to:
Posts (Atom)